The SDK includes a number of demonstration applications that are designed to help new users quickly understand how to use the NTV2 SDK to solve real-world problems using AJA devices.
The demonstration programs operate the same on all three supported platforms:
- Command-Line: Most of the demos are simple command-line programs that have no user interaction.
- GUI Application: Three demos provide a simple graphical user interface based on the Qt cross-platform application framework: NTV2QtPreview Demo, NTV2QtMultiInput Demo, and NTV2QtStreamPreview Demo.
- Note
- SDKs 17.5 and later are coded for Qt 6, whereas earlier SDKs were coded for Qt 5.
Most of the demos are designed with the following goals:
- Simple — This is why there is minimal error checking in the code, which detracts from its clarity.
- Focused — To demonstrate no more than a few specific hardware and/or SDK features.
Two of the demos — NTV2CCGrabber Demo and NTV2CCPlayer Demo — require libajacc, which is AJA proprietary, and not open-source.
- Note
- macOS: There are still some demos that don’t work properly on macOS due to missing features in the NTV2 driver or lack of third-party libraries (e.g. direct DMA transfers between AJA devices and third-party graphics cards, Streaming DMA, AutoCirculate Field Mode, etc.).
Building & Running the Demos
- The demo apps’ source code is included in the libajantv2 open source library on GitHub.
- Follow the build instructions documented in the README.md.
- Be sure the CMake variable
AJANTV2_DISABLE_DEMOS is set OFF (the default value).
Running the Demos
- To run the demonstration applications:
- Open a terminal window (cmd.exe on Windows, Terminal on macOS).
- Change the current directory to your local clone of the libajantv2 repository.
- Enter the relative path to the demo that’s located inside the build directory (created by CMake) … plus any arguments.
- Most demos use the same command line arguments for specifying…
- device (
-d|–device) — Specifies which device to use. Obviously, this is important when more than one device is connected to the host.
- video format (
-v|–videoFormat) — Specifies the video format to use
- frame buffer pixel format (
-p|–pixelFormat) — Specifies the frame buffer pixel format
- multiformat mode (
-m) — If specified, the demo will operate as if it must share the device with other programs; otherwise it will operate as if itʼs the only program using the device.
- NOTE: If you intend to simultaneously run more than one demo app using the same device, we recommend starting the first demo without the
-m option, then run all subsequent demos with the -m option.
- frames — Specifies the frame range to use (for most demos that use AutoCirculate). Examples:
–frames 7@10 — Use 7 frames, starting at frame 10.–frames 7-17 — Use frames 7 thru 17 (inclusive).–frames 12 — Use 12 frames, but lets the SDK determine the actual start and end frame numbers (using CNTV2Card::FindUnallocatedFrames).
- It’s helpful to run the demos under a debugger while monitoring device state with the “NTV2Watcher” tool.
- You can also interactively configure and run demos in “NTV2Watcher” using its “SDK Demos” Tool.
Playout Demos
- Contents
-
NTV2OutputTestPattern Demo
This command-line program demonstrates how to “push” a single test pattern frame to an AJA device and have it play that video signal forever without further action needed by the host.
Typical WFM display showing the output of an AJA device thatʼs connected to a host running ntv2outputtestpattern. (Audio playout is shown because “loopback” was enabled and an input signal was connected to the deviceʼs input.)
The NTV2OutputTestPattern class demonstrates…
- how to generate a test pattern of a particular video geometry and get it into a host buffer with the correct pixel format;
- how to transfer a single frame to an AJA device using DMA;
- how to programmatically perform device configuration and signal routing;
- how to be a “good citizen” to detect if another application is already using the device.
- Note
- This demo only works for non-UHD/4K/UHD2/8K formats.
The critical parts of the demo (for troubleshooting):
- Configuring the FrameStore/Channel being used:
- Enabling a FrameStore using CNTV2Card::EnableChannel.
- Setting the FrameStoreʼs mode to “playout” (as opposed to “capture”) using CNTV2Card::SetMode.
- Setting the FrameStoreʼs raster pixel format using CNTV2Card::SetFrameBufferFormat (fixed at 8-bit YCbCr).
- By default, this demo uses the FrameStoreʼs existing video format, but this can be overridden using the
-v option.
- Setting the output clocking reference to “free run” using CNTV2Card::SetReference.
- Routing the signal from the FrameStore to whatever video outputs are available on the device by calling CNTV2Card::Connect.
- Ensuring that bi-directional SDI connectors are configured for output by calling CNTV2Card::SetSDITransmitEnable.
- Transferring the test pattern image from the host to device memory using CNTV2Card::DMAWriteFrame.
- The frame being played by the FrameStore (and read from device memory) is dictated by the deviceʼs “output frame register” (
kRegChNOutputFrame). This demo interrogates the frame number using CNTV2Card::GetOutputFrame, and writes the image into that frame. Alternatively, the demo could have transferred the image into a specific frame number, and set the FrameStore to play that frame using CNTV2Card::SetOutputFrame.
Command line usage:
ntv2outputtestpattern [options...]
-d|--device {spec} Specifies the device to use by index number, serial number or generic model name.
Defaults to first device (index 0).
If model name specified, uses lowest-numbered matching device.
Specify '?' to list the available devices.
-c|--channel {spec} Specifies the framestore/channel as an unsigned integer number 1 thru 8.
Defaults to first channel (index 0).
-p|--pattern {spec} Optionally specifies the test pattern (or flat-field color) to show.
Defaults to 100% Bars.
Specify '?' to list the available patterns or colors.
-v|--videoFormat {spec} Optionally specifies the video format to use.
Defaults to whatever video format the device is currently using.
Specify '?' or 'list' to list the available video formats.
--pixelFormat {spec} Optionally specifies the pixel format to use. Defaults to 8-bit YCbCr.
Specify '?' or 'list' to list the available formats.
--vanc {spec} Optionally specifies the VANC mode to use:
0 | off | none Disables VANC
1 | on | tall Enables "tall" VANC
2 | taller | tallest Enables "taller" VANC
-?|--help|--usage Shows how to use this command.
NTV2Player Demo
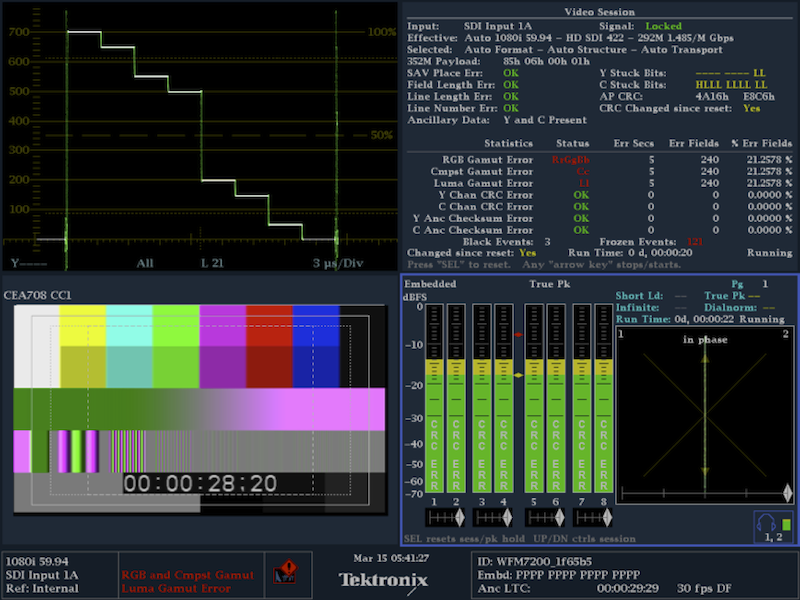
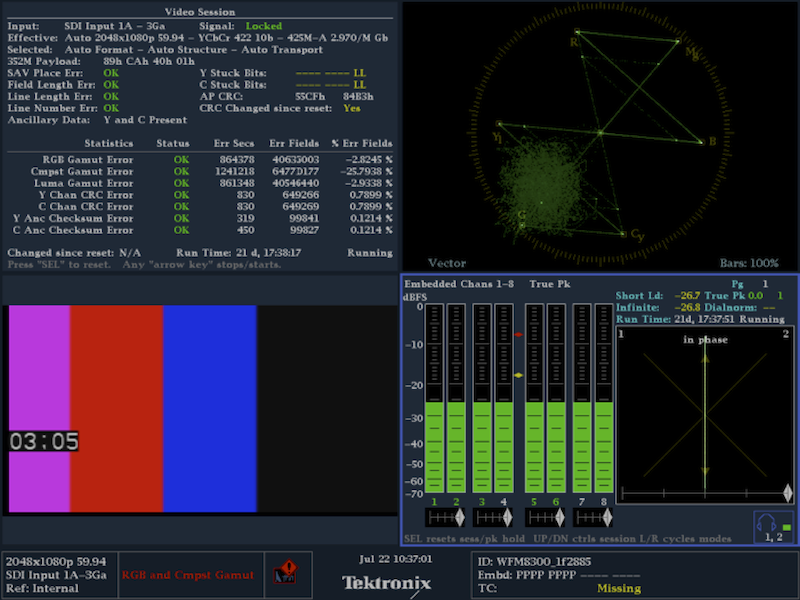
This command-line program plays out a repeating sequence of test patterns and audio tones with realtime timecode “burned” into the video.
This is a typical WFM display showing the output of an AJA device that's connected to a host running ntv2player. Note the timecode “burned” into the video test pattern and 8 channels of audio tone.
The NTV2Player class demonstrates…
- how to generate a test pattern of a particular video geometry and get it into a frame buffer with the right format;
- how to generate timecode and “burn” it into a video frame buffer;
- how to embed timecode into an AJA deviceʼs SDI output signal;
- how to generate a buffer of audio, and embed it into an AJA deviceʼs output signal;
- how to properly acquire and release an AJA device in order to use it exclusively;
- how to use AutoCirculate to efficiently stream video and audio;
- how to use an AJACircularBuffer and the producer/consumer model with AutoCirculate.
Command line usage:
ntv2player [options...]
-d|--device {spec} Specifies the device to use by index number, serial number or generic model name.
Defaults to first device (index 0).
If model name specified, uses lowest-numbered matching device.
-c|--channel {channelNum} Specifies the framestore/channel as an unsigned integer number 1 thru 8.
-v|--videoFormat {vidFormat} Specifies the video format to use. Use '?' or 'list' to list available formats.
-p|--pixelFormat {pixFormat} Specifies the pixel format to use. Use '?' or 'list' to list available formats.
-a|--anc {filePath} Optionally injects ancillary data as read from the specified
binary data file.
These files can be recorded using ntv2capture‘s ‘--ancʼ option.
-m|--multiChannel Enables multiformat mode, and tries to share the device with other processes.
--noaudio Omits audio, so that only video is transferred to device.
--novideo Omits video, so that only audio is transferred to device.
--frames {spec} Optionally specifies device frame buffers to use, where {spec} is:
numFrames[@startFrame] Specifies frame count (and optional start frame):
e.g. 7 -- First free 7 frames
e.g. 7@5 -- 7 frames starting at frame 5
startFrame-endFrame Explicitly specifies start and
end frame numbers:
e.g. 0-6 -- frames 0 thru 6 (inclusive)
Defaults to the lowest-numbered unused 7 frames.
-l|--ltc Transmit LTC instead of VITC.
-?|--help|--usage Shows how to use this command.
Ancillary Data Injection
The “–anc” command-line option allows a path to a binary data file to be specified, whose contents will be used to fill NTV2Playerʼs ancillary data buffers during AutoCirculate Playout.
NTV2Player::PlayFrames simply reads a fixed-size chunk of data (8K by default) into the anc buffer of the AUTOCIRCULATE_TRANSFER object. If playing interlaced video, then another chunk of data is read from the file into the “field 2” ancillary data buffer. This all happens before CNTV2Card::AutoCirculateTransfer gets called, at which time it all gets transferred to the device (via DMA).
The packet data in each per-field chunk in the file (typically 8K) is expected to be in the SDI Anc Buffer Data Format. For KONA IP or Io IP devices running ST-2110 firmware, the data can also be in the RTP Anc Buffer Data Format, and CNTV2Card::AutoCirculateTransfer will automatically convert the data into RTP if needed before transferring to the hardware.
In the binary data file, packet data is expected to start at the front of each chunk, and subsequent bytes in the chunk should be zero.
- Note
- If the per-field Anc buffer region size differs from the data fileʼs per-field chunk size, then ancillary data injection wonʼt work. The size of the Anc buffer region is controlled by the driver, and can be queried using CNTV2Card::GetAncRegionOffsetAndSize or changed using CNTV2Card::AncSetFrameBufferSize.
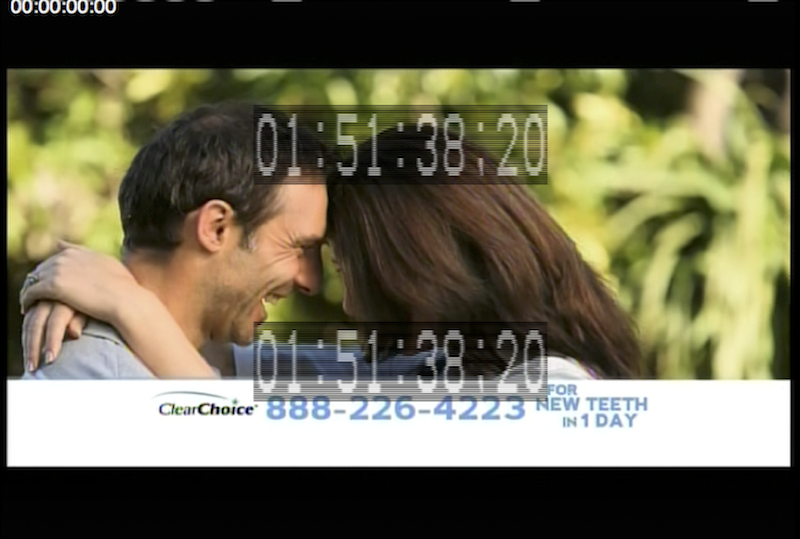
NTV2Player4K Demo
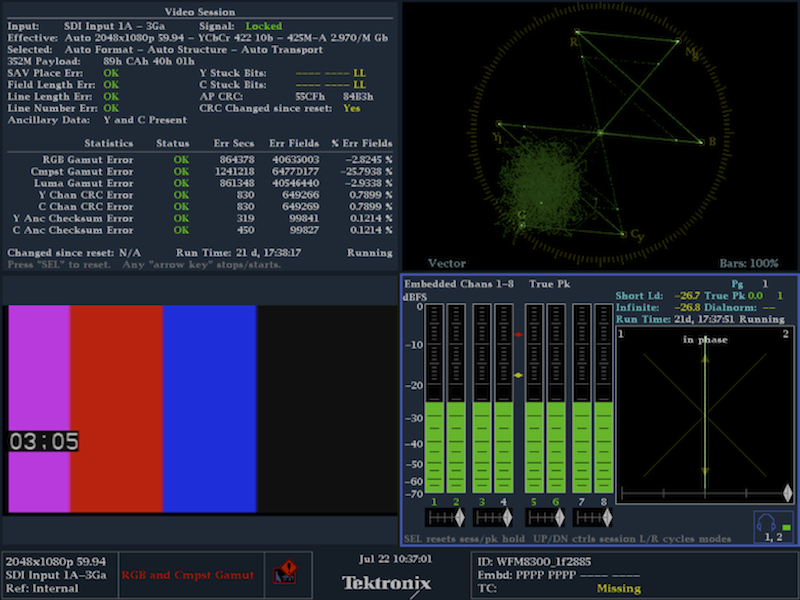
This command-line program is identical to the NTV2Player Demo except that it plays 4K/UHD video.
This is a typical WFM display showing quadrant 4 of a 4+-channel AJA device connected to a host running ntv2player4k. Note the timecode “burned” into the video test pattern and 8 channels of audio tone.
The NTV2Player4K class demonstrates everything the NTV2Player Demo does, plus…
- how to generate a 4K/UHD test pattern and get it into a 4K/UHD frame buffer;
- how to configure the device to use “squares” or Tsi;
- how to use 12G-capable FrameStores with built-in Tsi muxers;
- how to use AutoCirculate to efficiently stream 4K/UHD video with audio and timecode.
Command line usage:
ntv2player4k [options...]
-d|--device {spec} Specifies the device to use by index number, serial number or generic model name.
Defaults to first device (index 0).
If model name specified, uses lowest-numbered matching device.
-c|--channel {channelSpec} Specifies the framestore/channel as an unsigned integer number 1 or 5.
-v|--videoFormat {vidFormat} Specifies the video format to use. Use '?' or 'list' to list available formats.
-p|--pixelFormat {pixFormat} Specifies the pixel format to use. Use '?' or 'list' to list available formats.
-g|--6G/12G Use 6G or 12G output mode
-r|--rgb Output RGB from SDI connector(s), instead of YCbCr.
-s|--squares Uses "squares" routing (not TSI).
-t|--tsi Uses Two Sample Interleave (TSI) instead of quadrants (“squares”).
-h|--hdmi Enables HDMI playout.
-m|--multiChannel Enables multiformat mode, and tries to share the device with other processes.
--frames {spec} Optionally specifies device frame buffers to use, where {spec} is:
numFrames[@startFrame] Specifies frame count (and optional start frame):
e.g. 7 -- First free 7 frames
e.g. 7@5 -- 7 frames starting at frame 5
startFrame-endFrame Explicitly specifies start and
end frame numbers:
e.g. 0-6 -- frames 0 thru 6 (inclusive)
Defaults to the lowest-numbered unused 7 frames.
--noaudio Do not generate nor embed audio.
-a|--audioLinks {spec} Optional multi-link audio, for more than 16 audio channels, where {spec} is:
0 Silence
1-4 Number of audio systems to simultaneously operate
(Defaults to 1)
-?|--help|--usage Shows how to use this command.
NTV2Player8K Demo
This command-line program is identical to the NTV2Player Demo except that it plays 8K/UHD2 video.
The NTV2Player8K class demonstrates everything NTV2Player does, plus…
- how to generate an 8K/UHD2 test pattern and get it into an 8K/UHD2 frame buffer;
- how to configure the device to use quad-quad mode;
- how to use AutoCirculate to efficiently stream 8K/UHD2 video with audio and timecode.
Command line usage:
ntv2player8k [options...]
-d|--device {spec} Specifies the device to use by index number, serial number or generic model name.
Defaults to first device (index 0).
If model name specified, uses lowest-numbered matching device.
-c|--channel {number} Specifies the framestore/channel as a 1-based unsigned integer. Defaults to 1.
-v|--videoFormat {fmt} Specifies the video format to use. Use '?' or 'list' to list available formats.
-p|--pixelFormat {fmt} Specifies the pixel format to use. Use '?' or 'list' to list available formats.
-m|--multiChannel Enables multichannel/multiformat mode, to share device with other processes.
-h|--hdmi Enables HDMI playout.
-t|--tsi Uses Two Sample Interleave routing instead of quadrants (“squares”).
--rgb Uses “RGB on the wire” (i.e. RGB-over-SDI instead of YCbCr).
-a|--audioLinks {spec} Optional multi-link audio, for more than 16 audio channels, where {spec} is:
0 Silence
1-4 Number of audio systems to simultaneously operate
(Defaults to 1)
-?|--help|--usage Shows how to use this command.
NTV2CCPlayer Demo
This command-line program reads text either from the standard input stream or from a built-in test document stream, and encodes that text into CEA-608 captions that are embedded into an outgoing SDI signal.
The NTV2CCPlayer class demonstrates…
- how to generate a test pattern of a particular video geometry and get it into a frame buffer with the right format;
- how to use the CNTV2CaptionEncoder608 and CNTV2CaptionEncoder708 classes to encode caption data into SD and HD video frames;
- how to use the custom ancillary data insertion feature of newer AJA devices (if available);
- how to properly acquire and release an AJA device in order to use it exclusively;
- how to use the new AutoCirculate APIs to efficiently play video.
Command Line Syntax
ntv2ccplayer [OPTION [...]] [FILEPATH [...]]
Plays video containing closed-caption data sourced from...
- the contents of one or more files specified as path arguments on the command line,
- standard input (if "-" used as a file argument),
- an internal plaintext source (if no file arguments provided).
...where...
OPTION DESCRIPTION
-d index#, serial#, or model Specifies the device to use.
--device=index#, serial#, or model Defaults to first device found.
-c 1..8 Specifies the channel/frameStore to use.
--channel=1..8 Defaults to channel 1.
-v formatSpec Specifies the video format to produce.
--videoFormat=formatSpec Defaults to 1080i5994.
Specify 'list' or '?' to display the valid video formats for the device.
--rgb Configure to emit dual-link RGB over SDI.
--square For 4K/UHD formats, configure for “squares” (quadrants) instead of the
TSI default (two-sample interleave).
-p formatSpec FrameStore pixel format to use.
--pixelFormat=formatSpec Defaults to v210 (10-bit YCbCr).
Specify 'list' or '?' to display the valid pixel formats for the device.
--noaudio Don't generate/embed audio tone.
--notimecode Don't generate/embed timecode.
-m|--multiChannel Enables multiformat mode, and tries to share the device with other processes.
-s, --stats Emits statistics to stdout.
By default, ntv2ccplayer emits caption text to stdout.
--vanc Uses a (tall) VANC frame geometry for the frame buffer.
By default, ntv2ccplayer uses normal frame geometry.
--frames {spec} Optionally specifies device frame buffers to use, where {spec} is:
numFrames[@startFrame] Specifies frame count (and optional start frame):
e.g. 7 -- First free 7 frames
e.g. 7@5 -- 7 frames starting at frame 5
startFrame-endFrame Explicitly specifies start and
end frame numbers:
e.g. 0-6 -- frames 0 thru 6 (inclusive)
Defaults to the lowest-numbered unused 7 frames.
-
n, --noline21 Don
't encode/embed "analog" caption data into line 21 (SD only). By default, for SD output, ntv2ccplayer will encode "analog" CC data into line 21.
--no608 Don't transmit CEA608 anc data packet(s).
By default, ntv2ccplayer will transmit CEA608 anc data packets.
--no708 Don't transmit CEA608 anc data packet(s).
By default, ntv2ccplayer will not transmit CEA708 anc packets for SD video,
but will transmit CEA708 packets for HD video.
--608chan=chanSpec[,...] Specifies the CEA608 caption channel to use.
Legal values: CC1 | cc1 Caption channel 1 (default).
CC2 | cc2 Caption channel 2.
CC3 | cc3 Caption channel 3.
CC4 | cc4 Caption channel 4.
TX1 | tx1 Text channel 1.
TX2 | tx2 Text channel 2.
TX3 | tx3 Text channel 3.
TX4 | tx4 Text channel 4.
-e exit|loop|idle[,...] Specifies what happens when the last specified text file's contents have been queued
for playout.
--
end=exit|loop|idle[,...] Legal values: exit Terminates ntv2ccplayer after all text files have played. (Default)
loop Replay the caption text file(s) forever.
idle Continue to play frames indefinitely, but without captions.
-r number[,...] Specifies the rate at which caption text is produced, in characters per minute.
--rate=number[,...] Defaults to 500 characters per minute.
--608mode=modeSpec[,...] Specifies the CEA608 caption mode to use.
Legal values: roll|roll4 4-line roll-up, the default
roll3 3-line roll-up
roll2 2-line roll-up
paint paint-on captions
pop pop-on captions
--newline Specifies that newline characters (CR, LF, CR/LF) in the text files will start new caption rows.
By default, CR, LF, CR/LF is treated as ordinary whitespace.
- Note
- Multiple CEA608 caption channels can be streamed simultaneously by specifying more than one channel in the
–608mode parameter. Use a comma between each one (no spaces), and don’t specify the same channel more than once. For example, to stream “fileA” into caption channel CC1 and “fileB” into CC3, with different rates and modes, use ntv2ccplayer –stats –608chan=cc1,cc3 –608mode=roll3,pop –rate=800,1200 fileA fileB .
-
File data is assumed to be plaintext, unless the file name has a “.scc” or “.SCC” extension and contains SCC caption data. SCC playout ignores the
–rate and –608mode settings. The default or specified –608chan may or may not be correct for the SCC file’s data.
-
This demo requires the AJA-proprietary libajacc.
Changes in SDK 16.0
- Support for 2Kx1080 playout;
- Support for Dual-Link RGB-over-SDI playout;
- Support for Low Frame Rate (LFR) 4K/UHD (Tsi & “squares”) playout.
The NTV2CCPlayer class used in the demo app is capable of simultaneously generating and injecting captions into more than one NTV2Line21Channel at independent rates and NTV2Line21Modes. For example, in "main.cpp"...
playerConfig.fChannelGenerators.clear ();
generatorConfig.fFilesToPlay.clear ();
generatorConfig.fFilesToPlay.push_back (string ("path/to/caption_channel_1_file.txt"));
generatorConfig.fNewLinesAreNewRows = true;
generatorConfig.fCharsPerMinute = 1000;
playerConfig.fChannelGenerators [generatorConfig.fCaptionChannel] = generatorConfig;
generatorConfig.fFilesToPlay.clear ();
generatorConfig.fFilesToPlay.push_back (string ("path/to/caption_channel_2_file.txt"));
generatorConfig.fNewLinesAreNewRows = true;
generatorConfig.fCharsPerMinute = 700;
playerConfig.fChannelGenerators [generatorConfig.fCaptionChannel] = generatorConfig;
generatorConfig.fFilesToPlay.clear ();
generatorConfig.fFilesToPlay.push_back (string ("path/to/caption_channel_3_file.txt"));
generatorConfig.fNewLinesAreNewRows = true;
generatorConfig.fCharsPerMinute = 500;
playerConfig.fChannelGenerators [generatorConfig.fCaptionChannel] = generatorConfig;
generatorConfig.fFilesToPlay.clear ();
generatorConfig.fFilesToPlay.push_back (string ("path/to/caption_channel_4_file.txt"));
generatorConfig.fNewLinesAreNewRows = true;
generatorConfig.fCharsPerMinute = 300;
playerConfig.fChannelGenerators [generatorConfig.fCaptionChannel] = generatorConfig;
generatorConfig.fFilesToPlay.clear ();
generatorConfig.fFilesToPlay.push_back (string ("path/to/caption_channel_text1_file.txt"));
generatorConfig.fNewLinesAreNewRows = true;
generatorConfig.fCharsPerMinute = 200;
playerConfig.fChannelGenerators [generatorConfig.fCaptionChannel] = generatorConfig;
generatorConfig.fFilesToPlay.clear ();
generatorConfig.fFilesToPlay.push_back (string ("path/to/caption_channel_text2_file.txt"));
generatorConfig.fNewLinesAreNewRows = true;
generatorConfig.fCharsPerMinute = 200;
playerConfig.fChannelGenerators [generatorConfig.fCaptionChannel] = generatorConfig;
generatorConfig.fFilesToPlay.clear ();
generatorConfig.fFilesToPlay.push_back (string ("path/to/caption_channel_text3_file.txt"));
generatorConfig.fNewLinesAreNewRows = true;
generatorConfig.fCharsPerMinute = 200;
playerConfig.fChannelGenerators [generatorConfig.fCaptionChannel] = generatorConfig;
generatorConfig.fFilesToPlay.clear ();
generatorConfig.fFilesToPlay.push_back (string ("path/to/caption_channel_text4_file.txt"));
generatorConfig.fNewLinesAreNewRows = true;
generatorConfig.fCharsPerMinute = 200;
playerConfig.fChannelGenerators [generatorConfig.fCaptionChannel] = generatorConfig;
NTV2DolbyPlayer Demo
This command-line program plays out a repeating sequence of test patterns and audio tones with realtime timecode “burned” into the video.
The NTV2DolbyPlayer is almost identical to NTV2Player, but specifically demonstrates…
- how to playback recorded Dolby audio from a binary data file and play it through a device HDMI output;
- how to generate and play tone to a device HDMI output.
Command line usage:
ntv2dolbyplayer [options...]
-d|--device {spec} Specifies the device to use by index number, serial number or generic model name.
Defaults to first device (index 0).
If model name specified, uses lowest-numbered matching device.
-c|--channel {channelNum} Specifies the framestore/channel as an unsigned integer number 2 thru 4.
-v|--videoFormat {vidFormat} Specifies the video format to use. Use '?' or 'list' to list available formats.
-p|--pixelFormat {pixFormat} Specifies the pixel format to use. Use '?' or 'list' to list available formats.
--dolby {path/to/
binary/file} Specifies a
binary data file containing Dolby-encoded audio to play.
-r|--ramp Generate and play a repeating audio ramp pattern (overrides --dolby).
-m|--multiFormat Enables multiformat mode, and tries to share the device with other processes.
--noaudio Omits audio, so that only video is transferred to device.
--novideo Omits video, so that only audio is transferred to device.
--version Display the SDK version information and exit.
--frames {spec} Optionally specifies which device frame buffers to use:
num[@start] Specifies frame count (and optional start frame).
start-
end Explicitly specifies start &
end frames.
-?|--help|--usage Shows how to use this command.
NTV2StreamPlayer Demo
This command-line program plays out a repeating sequence of test patterns with realtime timecode “burned” into the video using the asynchronous streaming APIs.
The NTV2StreamPlayer class is identical to the NTV2Player Demo except for…
- how to stream video asynchronously using CNTV2Card’s Streaming API
- Note
- KONA XM™ only!
Command line usage:
ntv2player [options...]
-d|--device {spec} Specifies the device to use by index number, serial number or generic model name.
Defaults to first device (index 0).
If model name specified, uses lowest-numbered matching device.
-c|--channel {channelNum} Specifies the framestore/channel as an unsigned integer number 1 thru 8.
-v|--videoFormat {vidFormat} Specifies the video format to use. Use '?' or 'list' to list available formats.
-p|--pixelFormat {pixFormat} Specifies the pixel format to use. Use '?' or 'list' to list available formats.
-m|--multiChannel Enables multiformat mode, and tries to share the device with other processes.
-l|--ltc Transmit LTC instead of VITC.
-?|--help|--usage Shows how to use this command.
Capture Demos
- Contents
-
NTV2Capture Demo
This simple command-line program shows how to capture video frames provided to an AJA device.
The NTV2Capture class demonstrates…
- how to properly acquire and release an AJA device in order to use it exclusively;
- how to use AutoCirculate to efficiently stream video and audio;
- how to use an AJACircularBuffer and the producer/consumer model with AutoCirculate.
Itʼs configured in main() by a CaptureConfig class thatʼs used in other capture demos.
Command line usage:
ntv2capture [options...]
-d|--device {spec} Specifies the device to use by index number, serial number or generic model name.
Defaults to first device (index 0). Model name uses lowest-numbered matching device.
-c|--channel {number} Specifies the framestore/channel to use. Must be an
unsigned integer
value, 1 thru 8.
Defaults to channel 1.
-i|--input {spec} Specifies the device input connector to use, where inputSpec is 1|2|3…
Defaults to '1'. Specify 'list' or '?' to display valid inputs for the device.
-p|--pixelFormat {spec} Specifies the pixel format to use. Use '?' or 'list' to list available formats.
-m|--multiFormat Enables multichannel/multiformat mode, and shares the device with other processes.
By default, it assumes full control over the device.
-a Enables capture of ancillary data using deviceʼs Anc extractor firmware.
--anc {filePath} Enables recording of captured raw anc buffer data into the specified
binary data file.
If {filePath} is an empty
string, a
default file name will be used.
This file can be played back using ntv2player‘s ‘--ancʼ option.
--noaudio Disables audio capture.
--frames {spec} Specifies which device frame buffers to use:
numFrames[@startFrame] Specifies frame count (and optional start frame).
startFrame-endFrame Explicitly specifies start and
end frame numbers.
-?|--help|--usage Shows command usage and options.
Ancillary Data Recording
The “–anc” command-line option records NTV2Captureʼs ancillary data buffers into a binary data file during AutoCirculate Capture.
NTV2Capture::ConsumeFrames simply writes the fixed-size contents (typically 8K) of the frameʼs ancillary data buffer into a binary data file. If the incoming video is interlaced, then the “field 2” buffer is also written into the file.
The packet data in each per-field chunk in the file (typically 8K) will be in the SDI Anc Buffer Data Format. For KONA IP or Io IP devices running ST-2110 firmware, the data will automatically be converted from the RTP Anc Buffer Data Format by CNTV2Card::AutoCirculateTransfer immediately after a successful transfer.
In the binary data file, packet data starts at the first byte of each chunk, while subsequent bytes in the chunk after the last packet are zeroed.
- Note
- The data fileʼs per-field chunk size is determined by the per-field Anc buffer region size, which is controlled by the driver, and can be queried using CNTV2Card::GetAncRegionOffsetAndSize or changed using CNTV2Card::AncSetFrameBufferSize.
NTV2Capture4K Demo
This command-line program is identical to NTV2Capture Demo except that it captures 4K/UHD video using its NTV2Capture4K class. It differs from NTV2Capture Demo in several ways:
- Captures only 4K/UHD video.
- By default, it captures TSI (two sample interleave) video. It can capture "squares" (4-link quadrants) via the –squares command line option.
- The –audioLinks option can capture multi-link audio data into raw binary data files for devices with appropriate firmware;
- Only the -c option can be used to specify the capture channel (FrameStore), whereas in NTV2Capture, the -c and -i options allow specifying the channel, or input source, or both;
- Thereʼs no –frames option: NTV2Capture4K always uses fixed frame ranges;
- Thereʼs no –a option: NTV2Capture4K always captures anc data;
- Thereʼs no –anc option: NTV2Capture4K cannot record captured ancillary data into raw binary data files;
- Thereʼs no –noaudio option: in NTV2Capture4K, –audioLinks 0 will disable audio capture;
- Doesnʼt log warnings about CRC/TRS errors received for devices that support SDI error checking;
- Doesnʼt log PCM/NonPCM changes that may occur in the received audio stream;
- Doesnʼt log warnings about Anc buffer overruns.
Command line usage:
ntv2capture4k [options...]
-d|-device {spec} Specifies the device to use by index number, serial number or generic model name.
Defaults to first device (index 0).
If model name specified, uses lowest-numbered matching device.
-c|--channel {number} Specifies the framestore/channel to use. Must be an
unsigned integer
value, 1 or 5.
Defaults to channel 1.
-p|--pixelFormat {formatSpec} Specifies the pixel format to use. Use '?' or 'list' to list available formats.
-m|--multiFormat Enables multichannel/multiformat mode, and shares the device with other processes.
By default, it assumes full control over the device.
-s|--squares Use Square routing? (Defaults to TSI)
-a|--audioLinks {count} Optional multi-link audio (can operate > 1 audio system), where {count} specifies
the number of audio systems to operate:
0 Silence
1 Normal 16-ch audio (default)
2 thru 4 Multi-link audio from multiple SDI links (32/48/64 audio channels)
-?|--help|--usage Shows how to use this command.
NTV2Capture8K Demo
This command-line program is identical to the NTV2Capture Demo except that it captures 8K/UHD2 video.
The NTV2Capture8K class demonstrates…
- how to properly acquire and release an AJA device in order to use it exclusively;
- how to use AutoCirculate to efficiently stream video and audio;
- how to use an AJACircularBuffer and the producer/consumer model with AutoCirculate.
- how to capture 8K/UHD2 video.
Command line usage:
ntv2capture8k [options...]
-d|--device {spec} Specifies the device to use by index number, serial number or generic model name.
Defaults to first device (index 0).
If model name specified, uses lowest-numbered matching device.
-c|--channel {number} Specifies the framestore/channel to use. Must be an
unsigned integer
value, 1 or 5.
Defaults to channel 1.
-p|--pixelFormat {formatSpec} Specifies the pixel format to use. Use '?' or 'list' to list available formats.
-m|--multiFormat Enables multichannel/multiformat mode, and shares the device with other processes.
By default, it assumes full control over the device.
-?|--help|--usage Shows how to use this command.
NTV2CCGrabber Demo
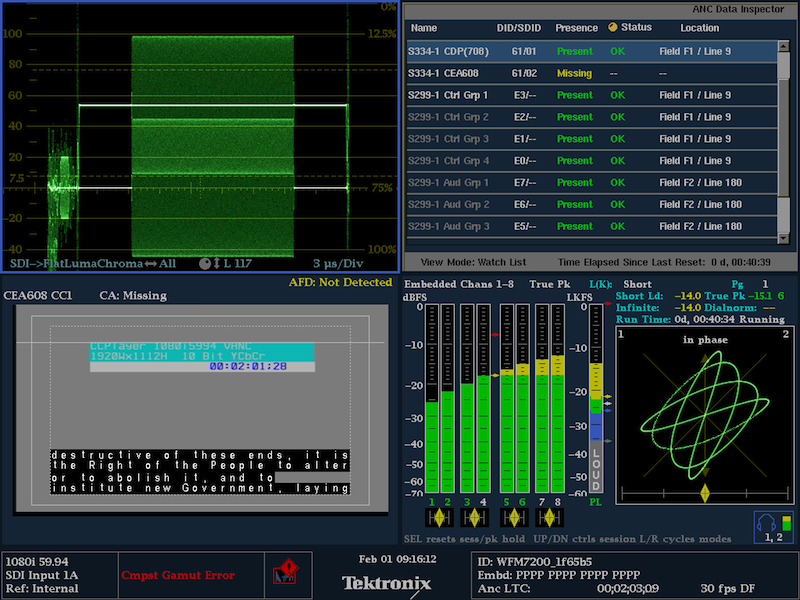
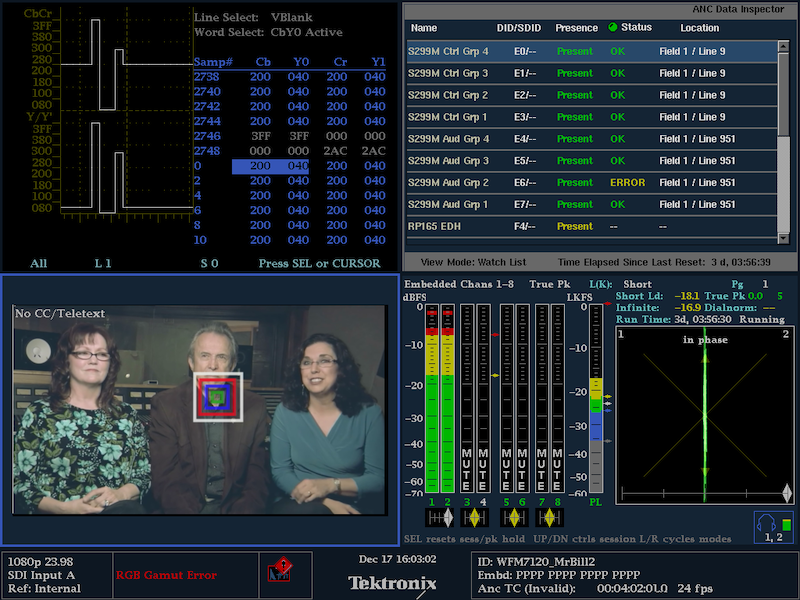
This command-line program “grabs” CEA-608 (and “608-over-708”) closed-caption data that may be present in a video signal, streams it to standard output, and optionally “burns” it into the video for playout.
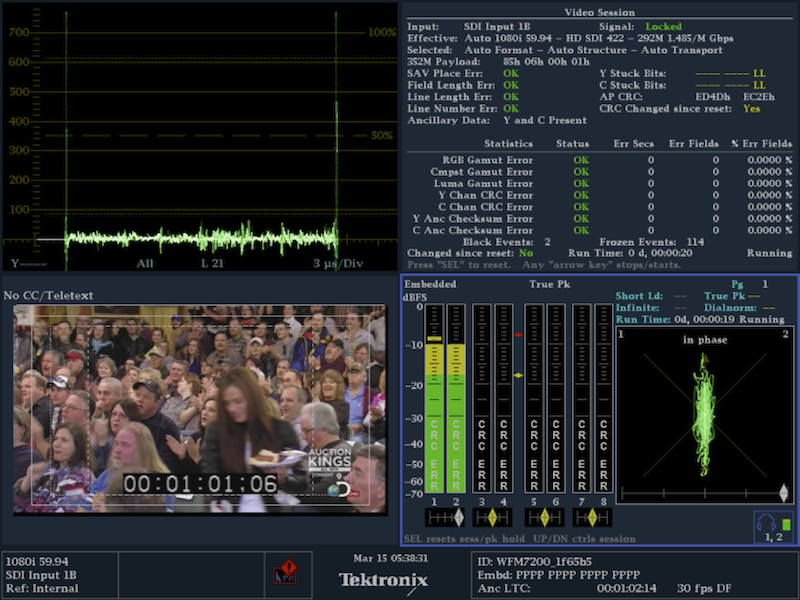
This shows a screenshot of video from a device while ntv2ccgrabber runs with the –burn option. The status display turns red if caption data is missing or can’t be decoded, green when present and being decoded properly, and shows other useful status information.
The NTV2CCGrabber class demonstrates…
- the CNTV2CaptionDecoder608 and CNTV2CaptionDecoder708 classes provided in the “libajacc” Closed-Caption Library to decode CEA-608 or CEA-708 closed-caption data that may be present on a video stream;
- the custom ancillary data extraction feature of AJA devices (if available);
- using the AJAAncillaryList and AJAAncillaryData classes;
- using a mixer/keyer widget to superimpose graphics with alpha (transparency) over live video;
- how to react to input video format changes, including loss of signal, and keep running;
- using an AJACircularBuffer and the producer/consumer model with AutoCirculate;
- use the CNTV2CaptionRenderer to “burn” decoded caption text into the frame buffer at the correct on-screen location with the proper attributes (color, transparency, etc.).
This demo uses the “libajantv2” Class Library to ingest video and ancillary data, and the “libajacc” Closed-Caption Library to decode US NTSC-based captions:
- 525i: EIA-608 “line 21” and/or CEA-608 in VANC;
- 720p: CEA-608 and/or CEA-708 (“608-in-708” only) in VANC;
- 1080i5994: CEA-608 or CEA-708 (“608-in-708” only) in VANC;
Although NTSC captions arenʼt technically recommended for use in any other video format, this demo will attempt to capture most other video formats, including dual-link RGB, 2K×1080p, UHD & 4K (TSI or square-division), and if it happens to find NTSC caption packets in the video stream, it will decode them, as above.
The demo’s operation can be controlled by pressing certain keys on the keyboard while it’s running.
- Press ‘1ʼ thru ‘4ʼ to change displayed caption channel to CC1 thru CC4.
- Press ‘5ʼ thru ‘8ʼ to change displayed caption channel to TX1 thru TX4.
- Press ‘Hʼ or ‘hʼ to toggle the heads-up-display (HUD) on or off.
- Press ‘Oʼ or ‘oʼ to change the output on-the-fly.
- Press ‘Pʼ or ‘pʼ to change the capture buffer pixel format on-the-fly.
- Press ‘Qʼ or ‘qʼ to exit the demo.
- Press ‘Sʼ or ‘sʼ to change the “608 source” on-the-fly.
- Note
- This demo behaves differently from the others in that it cannot be stopped using Ctrl-C. Press ‘qʼ or ‘Qʼ to quit.
-
This demo is NTSC-only — it has no capability to decode Teletext, ARIB, etc. captions.
-
This demo requires the AJA-proprietary libajacc.
Command Line Syntax
ntv2ccgrabber [OPTION [...]]
Displays captured CEA608 captions from incoming video.
...where...
OPTION DESCRIPTION
-d index#, serial#, or model Specifies the device to use.
--device=index#, serial#, or model Defaults to first device found.
-c 1..8 Specifies the channel/frameStore to use.
--channel=1..8 Defaults to channel 1.
-i inputSpec Specifies the device SDI input connector to use, where inputSpec
--input=inputSpec ...where inputSpec is '1|sdi1|2|sdi2|…'. Defaults to 'sdi1'.
Specify 'list' or '?' to display the valid inputs for the device.
-t tcSpec Specifies the timecode to use while capturing.
--tcsource=tcSpec By default, ntv2ccgrabber doesn’t capture timecode.
Specify 'list' or '?' to display the valid timecode inputs for the device.
-p formatSpec Specifies the FrameStore pixel format to use.
--pixelFormat=formatSpec Defaults to v210 (10-bit YCbCr).
Specify 'list' or '?' to display the valid pixel formats for the device.
-v, --vanc Uses (tall) VANC frame geometry to also capture VANC data in the frame buffer.
By default, ntv2ccgrabber uses normal frame geometry.
--608chan=cc1|cc2|cc3|cc4|tx1|tx2|tx3|tx4,... Specifies the CEA608 caption channel of interest.
Legal values: CC1 | cc1 Caption channel 1. This is the default.
CC2 | cc2 Caption channel 2.
CC3 | cc3 Caption channel 3.
CC4 | cc4 Caption channel 4.
TX1 | tx1 Text channel 1.
TX2 | tx2 Text channel 2.
TX3 | tx3 Text channel 3.
TX4 | tx4 Text channel 4.
--608src=source Specifies the CEA608 CC data source, where 'source' must be one of:
default - Best available (default).
line21 - Use CC data decoded from line 21.
608vanc - Use CC data from CEA608 packet(s) found in FB VANC lines.
708vanc - Use CC data found inside CEA708 packet found in FB VANC lines.
608anc - Use CC data from CEA608 packet(s) found using anc extractor.
708anc - Use CC data found inside CEA708 packet found using anc extractor.
-output=stream|screen|scc|stats Specifies what gets written into the standard output stream:
stream - A continuous stream of caption characters, as decoded.
screen - Periodically shows the on-screen captions.
scc - Emits Scenarist Closed Caption formatted data.
stats - Periodically emits statistics from the CEA-608 decoder.
-b Enables playout of captured video with decoded captions “burned-in” to the video.
--burn By default, ntv2ccgrabber doesn’t burn-in captions into captured video.
--audio Enables capturing embedded audio.
By default, ntv2ccgrabber doesn’t capture embedded audio.
-m, --multiChannel Shares the device with other programs, performs minimal routing changes, and if the
device is capable of it, configures it to allow the use of different video formats
on other device channels.
--frames {spec} Specifies which device frame buffers to use for AutoCirculate capture:
numFrames[@startFrame] Specifies frame count (and optional start frame).
startFrame-endFrame Explicitly specifies start and
end frame numbers.
EXIT STATUS DESCRIPTION
0 Success.
NTV2DolbyCapture Demo
This simple command-line program shows how to capture video frames provided to an AJA device.
The NTV2DolbyCapture is nearly identical to NTV2Capture, but specifically demonstrates…
- how to capture audio from a device HDMI input using its HDMI aux data extractors;
- how to detect and extract Dolby audio from the captured HDMI aux data.
Command line usage:
ntv2dolbycapture [options...]
-d|--device {spec} Specifies the device to use by index number, serial number or generic model name.
Defaults to first device (index 0). Model name uses lowest-numbered matching device.
-c|--channel {number} Specifies the framestore/channel to use. Must be an
unsigned integer
value, 1 thru 8.
Defaults to channel 1.
-i|--input {spec} Specifies the device HDMI input connector to use. Defaults to 'hdmi1'.
Specify 'list' or '?' to display valid inputs for the device.
-p|--pixelFormat {spec} Specifies the pixel format to use. Use '?' or 'list' to list available formats.
-m|--multiFormat Enables multichannel/multiformat mode, and shares the device with other processes.
--aux Records all HDMI aux data into file.
--audio Records HDMI aux audio into file.
--dolby Records HDMI aux Dolby audio into file.
--filter Only capture audio data from HDMI Aux.
--stats Outputs per-frame Dolby stats.
--version Display the SDK version information and exit.
--frames {spec} Optionally specifies which device frame buffers to use:
num[@start] Specifies frame count (and optional start frame).
start-
end Explicitly specifies start &
end frames.
-?|--help|--usage Shows command usage and options.
HDMI Auxiliary Data Recording
The “–aux” command-line option records NTV2DolbyCaptureʼs HDMI aux data buffers into a binary data file during AutoCirculate Capture.
NTV2Capture::ConsumeFrames simply writes the fixed-size contents (typically 8K) of the frameʼs ancillary data buffer into a binary data file. If the incoming video is interlaced, then the “field 2” buffer is also written into the file.
The packet data in each per-field chunk in the file (typically 8K) will be in the SDI Anc Buffer Data Format. For KONA IP or Io IP devices running ST-2110 firmware, the data will automatically be converted from the RTP Anc Buffer Data Format by CNTV2Card::AutoCirculateTransfer immediately after a successful transfer.
In the binary data file, packet data starts at the first byte of each chunk, while subsequent bytes in the chunk after the last packet are zeroed.
- Note
- The data fileʼs per-field chunk size is determined by the per-field Anc buffer region size, which is controlled by the driver, and can be queried using CNTV2Card::GetAncRegionOffsetAndSize or changed using CNTV2Card::AncSetFrameBufferSize.
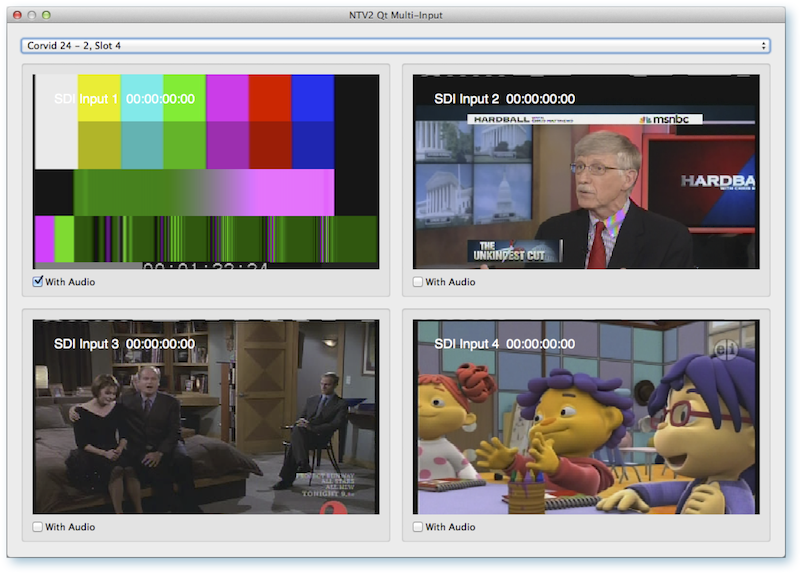
NTV2QtMultiInput Demo
This Qt-based GUI demonstration application simultaneously captures and displays four video streams from an AJA 4 or 8 input device (e.g., KONA 4, KONA 3G, Io4K, Corvid 44, Corvid 88, Corvid 24, etc.) in a “4-up” display, with or without audio playout on the host.
Screenshot of the Qt-based ntv2qtmultiinput application running on MacOS.
It demonstrates...
- how to use the AJAPreviewWidget, a reusable Qt-based GUI element that displays realtime video that's been grabbed from an NTV2FrameGrabber object;
- how to use the NTV2FrameGrabber class, a QThread that captures a video stream from any NTV2-compatible AJA device, and uses Qt signals to emit captured ARGB video frames;
- how to play two channels of audio on the host using Qt’s QAudioOutput class.
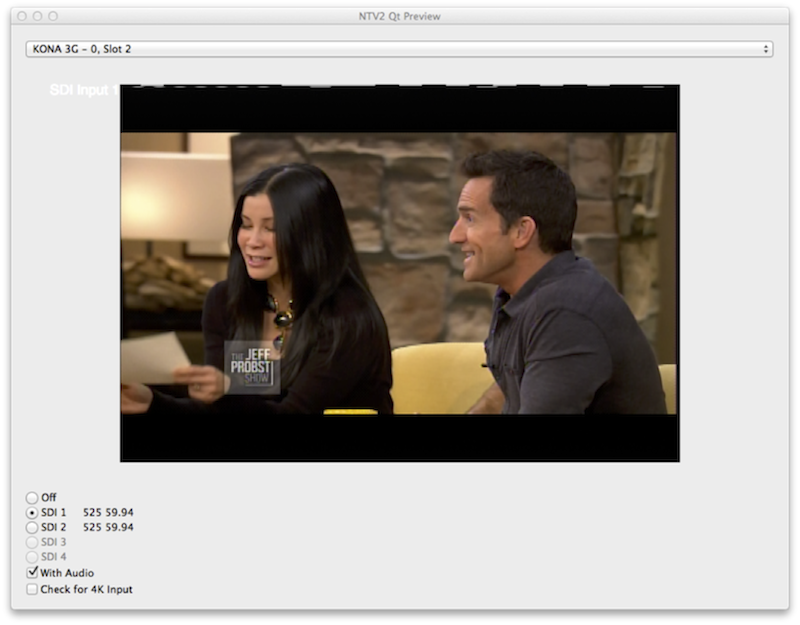
NTV2QtPreview Demo
This Qt-based GUI demonstration application captures and displays a single video stream from an AJA capture device in a single dialog window, with or without audio playout on the host.
Screenshot of the Qt-based ntv2qtpreview application running on MacOS.
It demonstrates…
- how to use the AJAPreviewWidget, a reusable Qt-based GUI element that displays realtime video;
- how to use the NTV2FrameGrabber class, a QThread that captures a video stream from any NTV2-compatible AJA device, and uses Qt signals to emit captured ARGB video frames.
- how to play up to two channels of audio on the host using Qt’s QAudioOutput class.
- how to react to detachment/attachment of AJA devices (e.g., via Thunderbolt) or to input video signal changes.
NTV2QtStreamPreview Demo
This Qt-based GUI demonstration application captures and displays a single video stream from the KONA XM in a single dialog window on the host.
It’s identical to the NTV2QtPreview Demo except for…
- it uses the AJAPreviewWidget, a reusable Qt-based GUI element that displays realtime video;
- it uses the NTV2FrameGrabber class, a QThread that captures a video stream using CNTV2Card’s streaming DMA APIs, and uses Qt signals to emit captured video.
- Note
- KONA XM™ only!
NTV2VCAM Demo
This demo implements a Virtual WebCam on Linux through the V4L2 loopback interface, and on Windows through the DirectShow interface. It uses AutoCirculate Capture to perform the streaming of video and audio.
- Linux Implementation: A command-line program that when run (with root privileges), it connects the NTV2VCAM instance into the V4L2 subsystem through V4L2’s loopback API, which creates a virtual video device that V4L2 applications can read from like any other V4L2 video source. It also makes the audio stream available to applications through the ALSA loopback facility.
- Command line usage:
ntv2vcam [options...]
--version Display the SDK version information and exit.
-d|--device {spec} Specifies the device to use.
Defaults to first device (index 0).
-c|--channel {number} Specifies the framestore/channel to use (1 thru 8).
Defaults to channel 1.
-p|--pixelFormat {spec} Specifies the frame buffer pixel format to use.
Defaults to 8-bit YCbCr.
Use '?' or 'list' to list available formats.
--hdmi Use first HDMI input instead of first SDI input.
-i|--vdev {devicePath} Specifies V4L2 loopback video device (defaults to /dev/video1).
-u|--adev {audioSpec} Specifies ALSA audio device (defaults to hw:Loopback,1,1).
-a|--audiolinks {number} Number of SDI audio links (0=silence or 1-4). Defaults to 1.
-?|--help|--usage Shows command usage and options.
Windows Implementation: A DLL that when registered (with Administrator privileges) allows DirectShow applications to stream video and audio from an NTV2 device.
- Note
- The parameters that stipulate device, channel, pixel format, etc. are hard-coded in the Windows-specific source code to capture from the first device’s first SDI input through the first Channel/FrameStore as 8-bit YCbCr. To change any of these parameters, the source code must be changed, the DLL rebuilt, and re-registered.
See the README.md (in demos/ntv2vcam) for detailed instructions on how to build, run and troubleshoot this demo.
Capture & Playout Demos
- Contents
-
NTV2Burn Demo
This command-line program captures video provided to the input of an AJA device, “burns” timecode into the video, then plays it out onto an output of that same AJA device. The program will use the timecode embedded in the input signal if it has any; otherwise it “invents” its own timecode. It also embeds whatever timecode it used into the output signal.
The picture shows a typical WFM display showing the output of an AJA device connected to a host running NTV2Burn. Note the timecode “burned” into the video and embedded in the output signal.
The NTV2Burn class demonstrates…
- like other demos, shows proper device acquire/release, and demonstrates device configuration and signal routing;
- how to use AutoCirculate to stream video/audio/anc using the producer/consumer model, with or without timecode.
- how to “burn” timecode into a buffer containing a frame of video data.
Command line usage:
ntv2burn [options...]
-d|--device {spec} Specifies the device to use by index number, serial number or generic model name.
Defaults to first device (index 0).
If model name specified, uses lowest-numbered matching device.
-i|--input {inputSource} Specifies video source to use (or '?' or 'list' to list available sources).
-t|--tcsource {tcSource} Specifies timecode source to use (or '?' or 'list' to list available sources)
-p|--pixelFormat {spec} Specifies pixel format to use (or '?' or 'list' to list available formats)
-m|--multiFormat Enables multiChannel/multiFormat mode & shares device with other processes
--noaudio If specified, does not transfer audio to/from device
--novideo If specified, does not transfer video to/from device
--noanc If specified, does not transfer ancillary data to/from device
--vanc If specified, enables tall-frame/VANC capture and playback
--iframes {spec} Specifies device frame buffers to use for input AutoCirculate:
--oframes {spec} Specifies device frame buffers to use for output AutoCirculate:
numFrames[@startFrame] Specifies frame count (and optional start frame)
startFrame-endFrame Explicitly specifies start and
end frame numbers
Defaults to lowest-numbered unused 7 frames.
--version Shows SDK version number and exits
-?|--help|--usage Shows how to use this command
NTV2Burn4KQuadrant Demo
This command-line program captures 4K/UHD video provided to four SDI inputs of an AJA device and “burns” timecode into the video, then plays it out onto four SDI outputs of a second AJA device (or the same device, if it has at least 8 channels). The program will use the timecode embedded in the input signal if it has any; otherwise it “invents” its own timecode. It also embeds whatever timecode it uses into the output signal.
This shows a typical WFM display showing one quadrant of the output AJA device connected to a host running ntv2burn4kquadrant.
The NTV2Burn4KQuadrant class demonstrates everything that NTV2Burn does, plus…
- how to deduce 4K/UHD geometry by looking at four consecutive SDI inputs;
- how to programmatically perform 4K/UHD signal routing;
- how to use AutoCirculate to efficiently stream 4K/UHD video and audio, including timecode;
- how to use an AJACircularBuffer and the producer/consumer model with AutoCirculate.
Command line usage:
ntv2burn4kquadrant [options...]
-i|--input {spec} Specifies the input/capture device by index number, serial number or generic model name.
Defaults to first device (index 0).
If model name specified, uses lowest-numbered matching device.
-o|--output {spec} Specifies the output/playout device by index number, serial number or generic model name.
Defaults to first device (index 0).
If model name specified, uses lowest-numbered matching device.
-t|--tcsource {tcSource} Specifies the timecode source. Use '?' or 'list' to list available sources.
-p|--pixelFormat {spec} Specifies the pixel format to use. Use '?' or 'list' to list available formats.
--noaudio Omits audio.
-?|--help|--usage Shows how to use this command.
NTV2FieldBurn Demo
This command-line program is very similar to the NTV2Burn Demo except that it captures interlaced SDI video into two separate host buffers, one for each field, “burns” timecode into each of them in different places in the raster, then recombines and plays out the “burned” fields onto an SDI output of the same device. The program will use the timecode embedded in the input signal if it has any; otherwise it “invents” a timecode of its own. It also embeds whatever timecode it used into the output signal.
The NTV2FieldBurn class demonstrates…
- how to properly acquire and release an AJA device in order to use it exclusively;
- how to programmatically perform device configuration and signal routing;
- how to use AutoCirculate to efficiently stream video and audio, with or without timecode;
- how to use an AJACircularBuffer and the producer/consumer model with AutoCirculate;
- how to use and manipulate timecode;
- how to perform segmented DMAs using AutoCirculate;
- how to “burn” timecode into a buffer containing a frame of video data.
Command line usage:
ntv2fieldburn [options...]
-d|--device {spec} Specifies the device to use by index number, serial number or generic model name.
Defaults to first device (index 0).
If model name specified, uses lowest-numbered matching device.
-i|--input {source} Specifies the SDI video source as an unsigned integer number 1 thru 8.
-p|--pixelFormat {spec} Specifies the pixel format to use. Use '?' or 'list' to list available formats.
-m|--multiChannel Enables multichannel/multiformat mode, and shares the device with other processes.
--noaudio Omits audio.
-?|--help|--usage Shows how to use this command.
NTV2LLBurn Demo
This command-line program is identical to the NTV2Burn Demo except that it does not use AutoCirculate, and is specifically designed to reduce latency to the bare-minimum of 3 frames.
The NTV2LLBurn class demonstrates…
- how to get “close to the metal” to reduce latency;
- how to use CNTV2Card::DMAWriteFrame and CNTV2Card::DMAReadFrame to transfer video to/from the device;
- how to use CNTV2Card::DMAWriteAudio and CNTV2Card::DMAReadAudio to transfer audio samples to/from the device, especially how to account for wrap-around in the deviceʼs audio sample buffer;
- how to “manually” operate the Anc extractor and inserter for capturing and playing Anc packets;
- how to read input timecode (from the SDI input signal or from the deviceʼs analog LTC input);
- the proper acquire/release semantics for using an AJA device exclusively;
- programmatic device configuration and signal routing;
- how to “burn” timecode into a buffer containing a frame of video data.
Command line usage:
ntv2llburn [options...]
-d|--device {spec} Specifies the device to use by index number, serial number or generic model name.
Defaults to first device (index 0).
If model name specified, uses lowest-numbered matching device.
-i|--input {inputSource} Specifies the SDI video source as an unsigned integer number 1 thru 8.
-t|--tcsource {tcSource} Specifies the timecode source. Use '?' or 'list' to list available sources.
-p|--pixelFormat {spec} Specifies the pixel format to use. Use '?' or 'list' to list available formats.
-m|--multiChannel Enables multichannel/multiformat mode, and shares the device with other processes.
--noaudio Omits audio.
-?|--help|--usage Shows how to use this command.
NTV2Overlay Demo
This command-line program overlays live, incoming video with an image that has transparency.
The picture shows a typical WFM display showing the output of an AJA device connected to a host running NTV2Overlay.
The NTV2Overlay class demonstrates…
- like other demos, shows proper device acquire/release, and demonstrates device configuration and signal routing;
- how to use a Mixer/Keyer widget to overlay an image on top of live background video.
Command line usage:
ntv2overlay [options...]
-d|--device {spec} Specifies the device to use by index number, serial number or generic model name.
Defaults to first device (index 0).
If model name specified, uses lowest-numbered matching device.
-i|--input {inputSource} Specifies background video source to use (or '?' or 'list' to list available sources).
-m|--multiFormat Enables multiChannel/multiFormat mode & shares device with other processes
--version Shows SDK version number and exits
-?|--help|--usage Shows how to use this command
Other Demos
- Contents
-
NTV2EnumerateBoards Demo
This simple command-line program dumps information about every AJA device found on the local host.
The NTV2EnumerateDevices class shows how to…
- determine which SDK version is being used;
- use the CNTV2DeviceScanner class to discover AJA devices on a host;
- explore the various kinds of device information that can be obtained from the NTV2DeviceInfo structure;
- how to get device information using the “device features” API thatʼs provided in the “ntv2boardfeatures.h” header file.
NTV2SwitchBitfile Demo
This command-line program demonstrates how to dynamically switch bitfiles on devices that support dynamic firmware loading.
NTV2SwitchBitfile demonstrates…
- how to detect if an AJA device supports dynamic firmware loading in order to rapidly change capability on-the-fly;
- how to enumerate what bitfiles are available to install on a given device;
- how to rapidly switch to a new bitfile;
- how to re-detect what the “new” device is after a successful switch.
Command line usage:
ntv2switchbitfile [options...]
-d|--device {spec} Specifies the device to use by index number, serial number or generic model name.
Defaults to first device (index 0).
If model name specified, uses lowest-numbered matching device.
-l|--load {devID} Specifies the ID of the device firmware to load (hexadecimal value).
-v|--verbose Specifies verbose output.
-?|--help|--usage Shows how to use this command.
NTV2HDRSetup Demo
This simple command-line program performs HDR configuration on the HDMI output for a compatible AJA device on the local host.
The program shows how to…
- determine if the device supports HDMI-HDR;
- enable or disable HDMI-HDR on the device;
- how to configure for BT-2020 and/or constant luminance;
- how to configure for HLG or ST-2084 compliance.
- how to enable DolbyVision signaling.
Command line usage:
ntv2hdrsetup [options...]
-d|--device {spec} Specifies the device to use by index number, serial number or generic model name.
Defaults to first device (index 0).
If model name specified, uses lowest-numbered matching device.
-e|--eotf {spec} Specifies the EOTF to use:
0: Traditional gamma SD
1: Traditional gamma HD
2: SMPTE ST 2084
3: HLG
-l|--luminance Specifies the luminance to use:
0: Non-constant luminance
1: Constant luminance.
--dolbyvision Enables Dolby Vision signaling bit.
--nohdr Disables HDMI HDR output.
-v|--verbose Verbose output.
--version Displays the version and exits.
-?|--help|--usage Shows how to use this command.
Exit codes:
- 0 — Success (no errors)
- 1 — Failed: invalid argument(s)
- 2 — Failed: illegal EOTF value
- 3 — Failed: specified device not found
- 4 — Failed: device found, but not ready
- 5 — Failed: device has no HDMI HDR support
- 6 — Failed: device in use by another application


 1.8.14