 |
AJA NTV2 SDK
17.0.1.1246
NTV2 SDK 17.0.1.1246
|
|
AJA NTV2 SDK
17.0.1.1246
NTV2 SDK 17.0.1.1246
|
The NTV2 HEVC Software Development Kit (SDK) is a suite of classes and data types which allow end-users to access and control nearly any NTV2-compatible AJA device using the C++ programming language. It also provides a suite of classes and data types which allow end users to access and control the Corvid HEVC device which is equipped with an MB86M31 real time HEVC/H.265 encoder from Socionext.
All of the user level code is platform-independent including the HEVC specific APIs, HEVC demo application and HEVC Monitor, however kernel support for the Corvid HEVC device has only been added to the Linux and Windows drivers at this time. Specifically this driver has been designed to support AJA custom driver APIs to communicate with the Corvid HEVC video and audio systems and also the MB86M31 real time encoder on the Corvid HEVC. The HEVC APIs in this SDK we designed by AJA to be more closely aligned with the NTV2 SDK but still provide all the functionality of the MB86M31-Evaluation Board SDK from Socionext.
The purpose of the HEVC SDK is to enable third-parties to easily access and/or control the video, audio or ancillary data entering the Corvid HEVC, and also provide access and control to the MB86M31 real time encoder. The SDK provides support at various layers.
The driver runs at the "kernel" level and handles low-level communication with the device. It is a required component of the SDK and provides the user-space library with the means to communicate and control the device. HEVC support for talking directly to the MB86M31 real time encoder has been added to the AJA NTV2 Linux and Windows drivers. These drivers can talk to both a standard AJA NTV2 device and the Corvid HEVC equipped with an MB86M31 real time encoder using custom APIs defined in the user level side of the SDK.
The "ajantv2" library is the principal user-space library that an application must link with in order to access and control AJA devices. In this class we also provide a set of API's to access and control the Corvid HEVC equipped with an MB86M31 real time encoder. It implements a suite of C++ classes which an OEM application can instantiate and use to perform various operations on the AJA device and the MB86M31.
At the User Application layer, the SDK provides demo applications, diagnostic tools, and common applications that can be used to maintain the device and allow users to update the firmware for the Corvid HEVC and the MB86M31 real time encoder.
The Corvid HEVC must be installed in appropriate PCI Express slots. The minimum requirements are a PCI Express Gen2 x 8 lane.
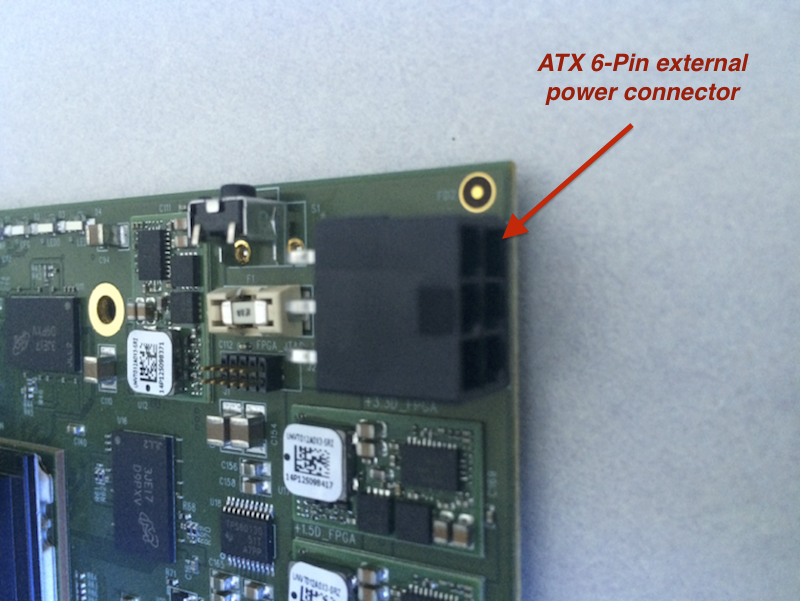
The Corvid HEVC is equipped with 4 SDI inputs and a reference/LTC Input. The first SDI input (SDI-1) is located at the top of the card and SDI-2 through SDI-4 follow. The very bottom connector is for reference or LTC input. The Corvid HEVC is capable of capturing multiple channels of SD or HD video or one channel of UHD video. In multi channel record mode the input video can be different formats.
It is necessary to supply external power to the Corvid HEVC using the ATX 6-Pin connector located on the back of the card:
There is an HEVC monitor application qthevcmon in the bin directory. Run this application and select the Debug tab to display the currently installed driver and firmware versions. The firmware versions will be labelled as either "OK" or "Iffy". "OK" means that they are the same firmware version that was used for SDK testing. "Iffy" means that the firmware has not been tested with this version of the SDK and should be updated.
To update the HEVC firmware, navigate into the ajaapps/crossplatform/hevcmaintenance directory and execute the flash_all.sh script. The script will install all the codec firmware then remind you to power cycle the system when it is complete. After the power cycle, use the HEVC monitor application to confirm that the correct firmware is installed.
On Linux, you can build just the parts you need for HEVC development.
ntv2firmwareinstaller program and update the NTV2 firmware.cd ajaapps/crossplatform/ntv2firmwareinstallermake cd ../../../bin./ntv2firmwareinstaller –p path/to/ntv2/bitfile.bithevcmaintenance program and update the codec firmware.cd ajaapps/crossplatform/hevcmaintenancemake ./flash_system.sh (flashes system file)./flash_mcpu.sh (flash mcpu file)./flash_mode.sh (flash single and multi mode files)ajaapps/crossplatform/qthevcmon/qthevcmon.pro. The executable will be in the top-most bin directory.cd ajaapps/crossplatform/demoapps/ntv2encodehevcmake cd ../../../bin./ntv2encodehevc -?Registered OEMs are given login credentials to access AJA's SDK support site, which can be securely accessed using any modern web browser at https://sdksupport.aja.com/.
Before installing the AJA NTV2 HEVC Windows SDK remove any earlier installed AJA NTV2 SDKs or HEVC SDKs using the Windows control panel programs and features. Older SDKs used a Windows MSI installer for both the SDK and the driver. This is not strictly necessary but it will clean the older SDK from the system directories. The new SDK is delivered as a .zip file with an included driver installer. This means that the SDK will no longer be installed to the Windows Program Files directory.
To use the new SDK, decompress the zip file to a working directory. At the top level you will see the following files.
Run the "ntv2driver-x.x.x.msi" to install the NTV2 driver that was tested with this SDK. The driver installer also installs the Microsoft Visual Studio runtime environment required to use the prebuilt SDK libraries and tools.
To build the SDK libraries and samples, open the Windows Visual Studio solution file APIandSamples\ajalibraries\ajantv2\build\ntv2_vs141.sln. Select the appropriate build configuration for your version of Visual Studio (Debug/Release + Win32/x64). Includes support for VS2013, 2015 and 2017. Select Build Solution. This will build the libraries to the lib directory and the binaries to the bin directory.
There is an HEVC monitor application (qthevcmon.exe) in the bin directory. Run this application and select the Debug tab to display the currently installed driver and firmware versions. The firmware versions will be labelled as either "OK" or "Iffy". "OK" means that they are the same firmware version that was used for SDK testing. "Iffy" means that the firmware has not been tested with this version of the SDK and should be updated.
To update the HEVC firmware, extract the hevcmaintenance.zip file in the bin directory. Navigate into the hevcmaintenance directory and double-click on the flash_all.bat file. The script will install all the codec firmware then remind you to power cycle the system when it is complete. After the power cycle use the HEVC monitor application to confirm that the correct firmware is installed.
The new NTV2 HEVC encode sample application is NTV2EncodeHEVC Demo. Connect a 720p50/59.94/60 or 1080p50/59.94/60 source to the SDI connector near the top of the Corvid HEVC board. Build and run the ntv2encodehevc application. The output should look similar to the following:
While the ntv2encodehevc application is running, you can monitor the encoding operation using the HEVC monitor application qthevcmon.exe in the bin directory.
Type ctrl-c to terminate the application.
See NTV2EncodeHEVC Demo for more information.
This section explores the HEVC specific APIs of the SDK. AJA borrowed extensively from the MB86M31-Evaluation Board SDK, but rather than copy directly, AJA implemented its own APIs which are much closer aligned with how the NTV2 SDK works. The MB86M31 encoder implementation is an extension of the current NTV2 APIs, with its own classes to initialize, configure, control, and stream data to and from the encoder.
Since the SDK is comprised of so many files, it might be handy to point out files that are specific to HEVC support. Here you can find definitions, enums, structures, classes, headers, and both user and kernel level source code. This section includes everything — nothing is hidden.
Five driver APIs have been added to support HEVC:
bool HevcMessageGetDeviceInfo (HevcMessageInfo* pMessage);bool HevcMessageSendCommand (HevcMessageCommand* pMessage);bool HevcMessageVideoTransfer (HevcMessageTransfer* pMessage);bool HevcMessageGetStatus (HevcMessageStatus* pMessage);bool HevcMessageDebugInfo (HevcMessageDebug* pMessage);In addition the above HEVC specific functions, the standard NTV2 CNTV2Card::ReadRegister and CNTV2Card::WriteRegister functions have been modified to recognize register reads and writes to the MB86M31 encoder. The PARM setup classes in ajalibraries/ajantv2/codecs/hevc/m31 make extensive use of CNTV2Card::ReadRegister and CNTV2Card::WriteRegister to read and write individual PARAM fields in the MB86M31 space. The interface is identical to CNTV2Card::ReadRegister and CNTV2Card::WriteRegister in the NTV2 space.
In order to configure and use the MB86M31 encoder, it must first be placed into the "init" state. One way to do this is to use the CNTV2m31 helper class, which is defined in ntv2m31.cpp and is part of the "ajantv2" library. The code to perform this initialization might look something like this:
The MB86M31 has a number of parameters that can be written to setup and configure the encoder. The parameters have been broken up into a number of categories. Currently they are:
AJA has provided a set of classes to manage each of these param categories which can be found in ajalibraries/ajantv2/codecs/hevc/m31. The M31 helper class also provides a wrapper that calls each of these categories to help setup the encoder for a specific preset. The AJA version of the HEVC presets are a table of enums found in ajalibraries/ajantv2/includes/ntv2m31enums.h. The SDK includes both "file" and "vif" presets. The HEVC Encode demo application uses these enums and helper class functions to set up the encoder to encode a specific format. Here is an example of how to setup the encoder for a given preset:
If you need to customize the setup and do something slightly different than what the preset provides, you can do that by loading all default params using the closest preset, then manipulate the channel structures directly before you write them out. AJA recommends not trying this unless you have reviewed all of the parameters and have a good understanding of how to set up the encoder manually. There are many duplicate params spread across all of the param categories and it's easy to miss changing some. Bit depth is a param used in several of the param categories, so you must change all of them. Below is an example of how you might change the bit depth manually:
The MB86M31 is controlled by changing the state of encode and video in components, and overall main state. This is done using the helper class functions:
bool ChangeMainState (HevcMainState mainState, HevcEncodeMode encodeMode);bool ChangeEHState (HevcEhState ehState, uint32_t streamBits);bool ChangeVInState (HevcVinState vinState, uint32_t streamBits);To begin an encode, first initialize the HEVC, setup the encoder using an M31VideoPrest, then issue the following control commands:
The current model used to stop the codec is to mark the last frame to be encoded, and have each thread monitor its progress through the pipeline. After processing the last frame, each thread discontinues further frame processing and the pipeline starves. Once the last HEVC frame has been transferred from the codec, it can be moved cleanly to the stop state by doing the following:
Frames are sent to and from the encoder using the following APIs located in the M31 helper class:
bool RawTransfer (uint8_t* pBuffer, uint32_t dataSize, bool lastFrame);bool EncTransfer (uint8_t* pBuffer, uint32_t bufferSize, uint32_t& dataSize, bool& lastFrame);Once the encoder has started, pass uncompressed YUV planar frames into the encoder using RawTransfer, and when the encoder has encoded the frame, you can get them back using EncTransfer. See the NTV2EncodeHEVC Demo application for more details.
 1.8.17